Wednesday, October 17, 2012

Just a quick note: Gowns In Action

I must admit that as I typed the title for this post, I had the Muppets "Pigs In Space" theme going through my head!  Ah, the silliness that is brought on by cold medicine :)
Here's a photo taken at the R.M.S Titanic Dinner:
The Bottle Green Gown came out wonderfully, much better than I had ever anticipated.  I have an hourglass waist, so I wasn't sure how a high wasted gown would work with my figure.  Answer: it worked just fine.  I even find myself excited to wear it again, the sign of a successful project.

Here's an oldie but goodie, a bustle day dress that I created for the Durango Heritage Train last year.  It uses the Truly Victorian TV101 bustle, so a very 1880s look.  At one point, as I was strolling around Durango with some friends of mine, a 'gentleman' drove by in a car and yelled "Nice A*s".  Very classy!!!

I unfortunately didn't get any shots of the maiden voyage of my new Pale Green Natural Form Gown for the cruise, but my husband was sick with a head cold so my attention was elsewhere.  That said, the gown was a success!  Short of losing one of the flowers that was safety pinned on the side of the gown, everything went nicely.  It is a little long for flats, which is what I wore, so I will have to pick up a pair of flesh tone or white dance shoes with a bit of a heel so that I don't have to worry about stepping on the hem.  All in all, though, it was very nice and I got TONS of compliments.

Monday, October 15, 2012

A Slight Change of Plans...

Hi all!
So, after getting all psyched to make the emerald I have had a slight change of plans.  My husband and I were in Durango at Durango Heritage Festival this weekend and were chatting with a few fellow passengers on the Victorian Dance Cruise we will be going on in January.  That's right, Victorian Dance Cruise :)  It will be epic: 7 days; Cozumel, Grand Cayman, and Jamaica; AND 3 Victorian Balls during the evenings!!!  Any of you that have ever been on a cruise ship know that things can be a little... tight on board.  Tiny rooms, miniatures of everything.  And my hoop skirts are 126 inches.  One of the balls, the Sapphire Ball, semi-requires a gown with a blue theme and originally I was thinking the  Sapphire and Snow Ballgown would be perfect.  But not with 126 inch hoops!!!  So, a new gown is required.
Hence the change in plans.  I will be making (hopefully in time!!!) a new natural form gown.  Another natural form gown would also make it so that I have no hoops or bustles to pack :)  Enter the Starry Night Gown:
Starry Night Gown
Keep in mind that the original gown, from La Mode Ilustree, was in black and white, so you'll have to use a bit of imagination here.  I am picturing a deep blue (perhaps royal?  navy? sapphire?) in either dupioni or shantung.  Silver lace to adorn the edges of the bodice and skirts.  And, I already found a lace that I love (see photo below)!!!  
Either silver or black bullion fringe trim for the skirts and bodice edge.  White lace for the neckline of the bodice, hopefully I can find some soft (aka not itchy) white lace.  I have some blue samples on order from NY Fashion Fabrics, which has provided me with fabrics in the past and they have been VERY good quality silks :)
All in all, I am pretty psyched about this project.  It will be tight to get it all done in time for January with classes and work etc, but I think I can make it happen.  I will also have to get over this nasty head cold that I picked up, although I don't anticipate that lasting too awfully long. 
Silver Lace
The patterns I have aren't quite perfect so I will have to do some re-working of those.  Not the end of the world, just a bit of extra work.  I'll keep you all appraised as samples come in and things begin to progress.

Tuesday, October 2, 2012

Help me choose the next gown :

Ok, everyone, I need a new project.  Honestly, if I don't have a project I feel a little lost.  Even if I had a project that I sat on for a few months (*cough* Green Gown *cough*), I at least still had a project to work on from time to time.  I am currently without.  OK, not completely without, I still have to finish the butterfly train on the Natural Form Gown for the cruise, but that's not a lot of work.
So, let's look at some options:
 This emerald gown could be interesting- not too much expensive trim, but it has a neat melding of greens.  And I don't really have a deep green Victorian gown.  I have the Sapphire and Snow antebellum gown, the Ruby Gown, and the new Pale Green Natural Form gown.
The Blue and White gown here caught my eye because it has some interesting trim work.
 This is an extant gown from the 1860s that I've had my eye on for a while.  If I can find the right fabric and lace, this gown could be absolutely stunning!!!
 This is another I've had in my archives for a while.  This one is more the 1880s massive bustle style that is always interesting.  It could be done either in deep blue or green, or for any color for that matter.
This is a pretty sweet natural form gown, but the lace may be SUPER expensive.  That is A LOT of fabric.

So what do you think?  Any gowns strike anyone as "Must Have"!?  I'll take a poll and see what you all think....

10/2/12 7pm MDT NOTE: I am adding 2 additional gowns, both blue (I seem to have a thing for that color).  Both are day dresses, not ball gowns.
 1870s Blue Paisley Gown
1870s Blue Plaid Gown


Sunday, September 30, 2012

Finally, After all these years...


OK, so perhaps not years, but most certainly months.  I have finally completed the 1912 Bottle Green Gown with only 2 weeks to spare!!!  Honestly, it sat draped over my manikin for months on end because I was too terrified to do the zipper.  Yes, it's true, I have never put in a zipper before.  But, to my defense, I have never created a gown that wasn't period, and hence never needed to do one.  I thought about going with buttons, or snaps, or clips or some sort, but in the end the zipper made the most sense.  So, last week, I finally put the damned thing in.  And, honestly, even though I didn't actually follow the directions for the invisible zipper, everything turned out just fine.  From there, I decided to layer the netting overskirt by taking a 6 inch tuck and tacked it up underneath the beaded overskirt.  That shows off just a bit of the lighter lace and gives the gown a more 1912 look.  I also finally took the plunge and wove a ribbon through the beaded netting to pull that up in the same way the original gown was presented.  To cover that black ribbon, I took a hair clip a friend of mine made that I had purchased a while ago and looped it through the ribbon.  I think it really brings out some of the colors in the netting :)  I also put in a clasp at the top of the zipper to ensure the evil thing doesn't decide to unzip during dinner. I sort of make it a thing not to go dress-less in public!!!
Also featured is my little helper, Newton.  You can see him inspecting my work, probably asking "Why did you put in so much time on this thing when you could have just been petting the kitties?!?"
Fortunately, the gown fits perfectly (the benefit of making your own stuff!!!), and with a petticoat I already have the skirts look fabulous!!!  I purchased a Gibson Girl style wig to go with it, the closest I could get to 1912.  It will be a little 'dated' (about 5 years dated) but no one will likely notice.
My husband and I were lucky enough to find a vintage tailcoat at Wear It Again, Sam downtown.  I never expected to find one long enough to fit him, but it works pretty well.  We also found a tux shirt that fits perfectly!!!  A quick trip to the formals place in the mall furnished the cummerbund, bow tie, and shirt and cuff links.  He's going to be dashingly handsome!
Since I haven't written in so long, I can't remember if I mentioned the purpose of this little outing.  We will be attending a Titanic Ball at the Durango Heritage Festival.  We were assigned the personas of 2 actual First-class passengers: Thornton and Orian Davidson.  A quick web search provided life details and some pretty nice portraits:
ImageThornton Davidson
Regarding Mr. Davidson:
"Mr Thornton Davidson was born 17 May 1880 the son of Sir Charles Peers Davidson, Chief Justice of the Quebec Supreme Court. The Davidson's were an indomitable Protestant family of United Empire Loyalists. His older brother Shirley and his fiancée, Eileen Hingston, died in a suicide pact by drowning in 1907 after Judge Davidson refused to allow Shirley to marry Eileen because she was a Roman Catholic.
Thornton Davidson was an accomplished yachtsman, " a sailor of intrepid daring and remarkable skill." He played hockey with the Montreal Victorias, played tennis and was a good horseman. He started as a teller at the Bank of Montreal, represented the Wall Street firm of Charles Head and Son in Montreal, then opened a brokerage house of his own with his partner, Robert Hickson.
He married Orian Hays, the second daughter of the president of the Grand Trunk Pacific Railway in Montreal on 3 November 1906.
Since neither of them had been abroad Charles Hays invited them to join him on a business trip to England. They boarded the Titanic at Southampton and occupied Cabin B-71 (Ticket No. F.C. 12750, £52)."
Regarding Mrs. Davidson:
"Mrs Thornton Davidson (Orian Hays), 27, was born November 18, 1884 the daughter of Charles Melville Hays and Clara Jennings Gregg, She and her husband, Thorton Davidson were returning to their home in Montreal after a holiday in Paris. Mr and Mrs Davidson occupied cabin B-71. Mr and Mrs Hays occupied cabin B-69."

Saturday, June 23, 2012

Going Green

Well, I apologize for being so lax in my updates, but between the wild fires and the heat, my sewing has been fairly limited.  I was, however, able to get portions of the bodice of the 1912 Bottle Green Gown finished :)  I line the bodice with bottle green satin, unfortunately not silk because I couldn't find any silk in the correct color and weave.  Then, I layered a beige lace with clear sequins over the front of the bodice.  I took the edging from that fabric and created a scalloped trim around the entire neckline.  That, of course, had to be hand sewn.  I then set up the fabric pieces for the black lace overbodice so that the sleeve edging was the scalloped edging of the fabric.  The front of the overbodice is a separate piece, and the 3 scallops are part of that.  I then hand sewed the lace to the inside of the scallops of the beige lace.  The neckline is gorgeous on, and the 2 laces give a ton of sparkle, I am pretty pleased with it.  I am still in the process of deciding whether to close the back portion of the gown with a zipper, which would not be historically correct.  The other option is hooks and eyes or snaps, which would be more historically correct, but probably not as 'sturdy.'  
I am currently working on the skirts- the green underskirt has the same beige trim as the bodice, but it rings the bottom of the gown.  There is then an overskirt of a black netting with velvet patterning on the bottom of the skirt, which has turned out to be a little tricky since it is hard to hide the seams on netting.
I also have been putting the finishing touches on the green natural form gown- hand tacking the lace trim on the pannier overskirt, hand sewing trim onto the lower seam of the bodice, etc.  So, coming along nicely!
I will try to be better about updates, but it all depends on how much sewing I am able to get done.  It is 102 degrees F today in Fort Collins, so being upstairs sewing is fairly miserable.  We don't have AC. Fun fun!


Tuesday, May 29, 2012

Green Gowns Galore

Well, it's been a while since I updated things here.  It's been so hectic that I really haven't gotten much in the way of sewing done.  I have been doing some trim ordering online for the green natural form gown- I am hoping that the mailman arrives today with my ecru gimp (he's still not here at it's 5pm!).  I found my old order of that beautiful cream lace that I used for the top of the natural form gown and procured an additional 12 yards so that I can add lace to the pannier overskirt as well.  That gown is coming along nicely, just waiting on bits and pieces here and there to arrive.  
This is a slightly older photo but it gives you a good idea of where this project is currently.  I have added more of that beautiful lace to the pannier overskirt, and I will trim that with the same ecru gimp that is on the upper bodice.  I am considering adding that lace to the bottom of the satin underskirt, but I haven't played around enough with it yet to make that decision.  

In addition, I began the process of figuring out the patterns needed for the Bottle Green 1912 Gown.  Pattern finding was easier than I had anticipated; I think the Simplicity fits the bill quite nicely.  I made the mockup in $2/yd muslin, and while it is white cotton, it still has some pizazz to it.  I had to borrow the narrow belt off of my bathrobe since the gown is meant to have a belt and the bodice is not quite right without it.  That said, the belt will be significantly thicker and not so... bathrobey.
 While the search for the pattern turned out to be significantly easier than I had anticipated, the search for the materials for the gown has been a NIGHTMARE.  I took a trip with a friend down to Denver Fabrics in Littleton and came back with a few basics.  First, I found the perfect bottle green satin on sale for $4 a yard.  EPIC find.  I haven't been able to find a sequined netting for the overskirt that I liked, but I did find a very nice black netting with printed velvet flowers.


The major fabrics of the skirt and underdress have been found and acquired.  The hard part is finding the trimmings.  In fact, it is much much MUCH easier to find Victorian style trimmings than it is to find 19-teens era trimmings.  Go figure.  I had assumed that as I creeped closer to the modern day, procurement of supplies would be simpler.  Guess not.  I have not been able to find even a whisper of beaded french netting for the lower bodice, and the ecru lame lace has not exactly been forthcoming either.  In order to create the beaded french netting, I ordered some E6000 craft glue and a bunch of swarovski crystal flatbacks.  If I can find a few hours to myself sometime in the coming weeks, I will attempt to make nice, beaded french netting out of high quality plain old french netting.  I may go crazy; maybe not from the glue fumes, but certainly from the task of gluing 1440 crystals onto netting!!!  I may also have to add some to the velvet printed netting as well.  For that, I will also add a beaded lace scalloped trim to the lower edge of that, assuming I can find what I want somewhere.  <sigh> This one has NOT been playing nice!

Monday, May 14, 2012

Finally getting somewhere...

Phew! Finals are over, and I have a lot more free time to work on various projects.  In fact, I had a fantastic 4 day weekend to work on the natural form gown, and I made some decent progress.  I finished the skirt, which is made of a cream colored super-shiny satin.  It still needs lace trim etc., but the worst of the work is completed.  I didn't take many photos of that process partly because the seams are all straight and there really wasn't much of interest and partly because I was just so darned psyched to have free time to sew that I just kept going without stopping!
Here's what I have so far- a mostly completed bodice with a very-in-need-of-ironing cream satin skirt.  The cream satin matches the cream of the lace perfectly, but has a bit of a sheen that really makes it pop.  I will be adding wide lace if I can find it at a reasonable price.  If not, I think it still works fairly well.
My petticoat is not quite stiff enough to support the mass of the skirt, so I will be adding horsehair braid to the lower edge of the satin skirt to give it a bit more volume.  Also, I will probably need to add some netting to the back gather to give it a bit more of the "bustled" look.  I am not used to natural form gowns, so this is a new adventure for me.
Once I had completed the skirt, I decided to tackle the first overskirt.  As you can see from the pattern piece laid out on the table, it is a large square that is then tied up to form the poof of the skirt.  Like the white satin skirt, there are 2 casings with ties sewn into the skirt that allow you to cinch it up to form the bustled look.  This is a closeup shot of the casing down the center seam of the overskirt.
 Here's the overskirt minus any trim that will be added.  I put in an order with EJoyce.com for the same lace that is featured on the bodice.  It took me 2 hours to hunt down that order- it was from sometime in 2010 so it took a lot of email searching!!!
At any rate, the skirt will be trimmed in the same cream lace that was featured on the bodice.  That will cover up the gathers in the skirt and make it look significantly more 'finished' than it does in these photos.  Also, I will use cream colored silk flowers to cover the gathers around the bustle.

So, we're getting there slowly but surely.  All that is left from a major project standpoint is the butterfly train and that will not be exceedingly difficult.  That is already cut out of the fabric and ready to go, so it is just a question of finding the time to work on that.  The trim on the overskirt shouldn't be too terrible- although that will most likely require hand sewing.  I will also have to figure out the best way to support the skirts and all of that weight so that they don't just fold in on themselves.  Coming along well so far, though!!!  :)


Sunday, May 6, 2012

Holy Bottle Green Batman!

For those of you who don't know me well, I love dressing up.  It really doesn't matter the era, I just love escaping my life and transforming into something entirely different.  Usually something a little more elegant and feminine than my regular life allows me.  Last year, Matt and I went down to the Durango Heritage Celebration for the Victorian Ball and the Heritage Train, all of which is done in full costume.  We were unable to attend the Titanic Dinner due to coursework on my part, but this year we are going to make it happen.  Essentially, you are assigned a personage who is listed on the actual Titanic passenger lists.  You dine, you dance, and at the end of the evening, you find out if you went down with the ship.  That may sound fairly morbid to most people, but I think it sounds like a fabulous time!  Probably because I am a woman; a good portion of them were saved.  Being the dainty creatures that we are, we got the lifeboats first.  The men, on the other hand, were expected to be chivalrous.  Matt has predicted an 80% chance that his character went down with the boat.  We shall see.
Ok, I diverge.  I have no 1912 clothing, especially not a 1912 evening gown.  Which necessitates another project (once I have finished the current natural form gown, of course!).  After some searching, I found that there aren't too many books of fashion plates from that era, which I find to be strange because there are TONS from the Victorian era.  I did some real gown searching on VintageTextile.com and AntiqueDress.com, which happen to be 2 of my most favorite window shopping sites ever!!!  I found one of the most beautiful gowns I have ever seen, and of course it was WAY over anything I would ever be willing to spend on vintage clothing.  Too bad, because it actually would have fit me!  Anyway, I will re-create it, or at least make a go of re-creating it because it will not be easy!!!


See what I mean, BEAUTIFUL!!!!  If I can accomplish half of that beading, I would be happy.  I think that this will require finding some pre-beaded fabric, which of course will not be inexpensive.  Some of the more rich details will, in fact, have to be embroidered by hand.  But, I think it is doable.  It may take me most of the summer, but in the end I might have one of the more beautifully classic gowns of my collection.  I will keep you all updated when I start this beauty, it will be an adventure!!!!


Tuesday, May 1, 2012

Somewhere in History

Hi all!
Exciting news!  I decided to purchase my own domain so that I have a bit more control over how I post things and the format that it comes in.  It is under construction for the time being so there is not much going on, but hopefully I can get that up and running once coursework is done.  The new domain: http://somewhereinhistory.com.  More updates as I get things going, but eventually I will be moving over there :)
Enjoy!!!
~Shadowhawk~

Sunday, April 29, 2012

Starting to come together

Ok, I know that I said that I wouldn't touch my sewing until finals were over.  I really did try; honestly I did.  But, in reward for finishing my Microbial Physiology project a week ahead of time, I gave myself 6 hours to sew this weekend.  And sew I did!

I started by searching through my spare scrap box to see if I had an appropriate lace and I found JUST enough of the beautiful white lace that I used for the Sapphire and Snow gown.  I love this lace because it has a lot of character, enough weight that it hangs nicely, and I know that I can manipulate it without it looking funky.  I started by pinning it onto the dress.  I them looked at a few different options for the top edge of the lace.  The photo has a wide border made from the same fabric as the bodice.  I tried this out... ick!  Too much going on.  It really didn't work since the bodice has that beautiful embroidery; it just made it look very very busy.  I scrapped that idea and decided I needed about a half inch trim, probably somewhere in the off white to beige color range to play off the flowers, and I was originally thinking velvet would be nice.  But, no white-ish velvet trim to be found at JoAnn and I didn't want to scrap my hard earned weekend of sewing in a supply issue.  I did find a nice off-white braided trim that worked perfectly with the lace color, so I went with it.  It melded nicely with the neckline, matched the lace brilliantly, and was nice and easy to work with.  Here it is pinned on the bodice in the dress form.

With that decided I started sewing.  This all had to be done by hand with tiny little invisible stitches so that everything looked natural.  If I had done it by machine it would have been a disaster!  Both the upper and lower portions of the braided trim needed to be secured, but the lower stitches also served to anchor the lace to the bodice so it was sorta a two-for-one.


I found a nice way to finish the back portion when I had to work with this lace for the last gown.  Essentially, I cut out one of the lace pattern pieces and use that as an overlay so that the corner comes together nicely.  Once I had it lined up and pinned properly, using tiny little stitches I meld it to the pattern so that you can't tell that it was a different piece of lace.  It just looks like the pattern itself is more ornate in the back portion and it really does come together nicely as you can see.

 Once the lace around the shoulders was completed, it was time to sew all of the button holes.  I have an aversion to buttonholes mostly because they were a nightmare on my old sewing machine.  And there are 16 on this gown, each spaced an inch apart.  But my new machine, a Brother SE400 does keyhole button holes at a single push of a button.  It is fantastic, truly a life saver!  As you can see, the buttonholes are nearly invisible on the outside fabric of the gown, but there is no need to hide them on the lining fabric.


 See, very lovely little perfect keyholes!  This fabric did have some marks that showed up as I sewed the buttonholes.  I think that they way the fabric pulls caused this.  However, on a little rubbing they disappear.
Here is the gown with the lace secured and the buttons finished. I haven't yet secured the side of the lace on the front left, so it appears a little uneven here.  However, I will secure it so that it is a seamless transition between sides.  I also still have to sew a slightly lighter lace along the petal sleeves, but things are really coming together!  With classes over in 2 weeks I hope to accelerate this project since I have to make a second gown before our cruise early next year among other nifty projects.  It really is coming along though :)

Tuesday, April 24, 2012

Voila! A bodice!

With finals coming up, sewing is officially on hold.  I have worked my tail off this semester, so luckily I need not worry too much, but Microbial Physiology and Bacteriology are not easy courses.  This little hiatus gives me some time to catch up with where I am in my project.  A few weekends ago, I got the sewing bug and spent most of my waking hours working on the bodice.  The last few entries have been an attempt to show the process in enough detail that it is interesting, and also so that I don't bomb one HUGE entry and then take a month hiatus from the blog.  Honestly, that is how my sewing goes.  If I pick it up, I have a hard time putting it down.  It is always "one more seam" which then turns into 8 or 9 and voila!  It's midnight.  Before an exam.  That I haven't studied for yet.  Hence not letting myself pick it up at all.

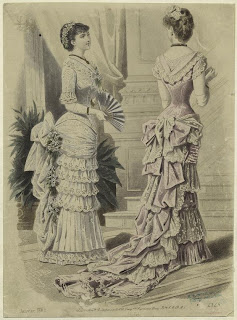
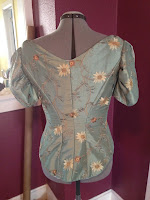
 Back to business.  I didn't like the puffy ballgown sleeves that were included with the bodice pattern, so I altered it.  The sleeves on the original gown were petal sleeves, very delicate, very not... poofy.  Nice, flowing, not poofy lace trimmed sleeves. Very elegant.  


 So, I changed the pattern.  I kept the original pattern piece for the sleeve, but I drew the petal shape that I wanted onto the pattern piece.  I then cut it.  Yup, I guessed (and I was right!).  After all of that telling you to make a mockup and whatnot, I did this on a whim, just to see if it would work.  I guessed the shape that I wanted from looking closely at the photo, and I just went with it.  And guess what?  They came out very nicely!


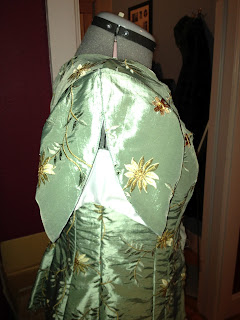
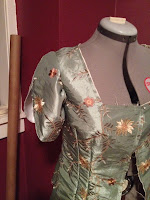
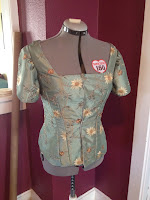
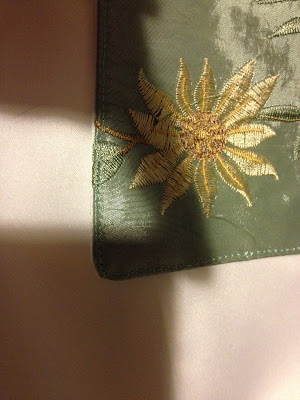
 Here is a view of the first sleeve finished.  The original poof sleeve did NOT have a lining included since there was a finished band at the bottom of the sleeve.  With this design, however, the inside of the fabric would have been visible.  So, I lined the sleeves with the same white satin as the rest of the bodice.  Honestly, I am really psyched about this design, I may have to use it again!!!  It allows a tight fitting shoulder to the bodice but enough room to move your arms up for turns and that sort of thing.  Ingenious!  It will be much easier to dance in.  It is one thing to look gorgeous, but these gowns are functional as well!!! Here are some additional images of the gown with the sleeves in (no lining quite yet):


Last post was about my little misadventure with the lining.  Luckily, I have lots of scraps of different varieties and I had a very  nice middle weight white satin leftover from the Sapphire and Snow Antebellum gown.  I was a little concerned at first that white might be too obvious, especially around the bones where the fabric tends to pooch a little bit.  But, as long as I was precise in my seams, everything would work out.  Once I had the lining matched, pinned and sewn to the bodice fashion fabric, I flipped it inside in and got to see the final product.  Until you press the newly sewn seams, it always looks a little awkward- the seams need to be pressed or sewn to settle nicely (or at least this is what I do).  By the way, when sewing the bodice to the lining, this is done with the two right sides facing, so essentially inside out.  You sew all around the outsides, but leave the arm holes not sewn so that you can turn it outside out, or inside in, or the right way (however you want to say it).

I, being a perfectionist, cannot stand seams that don't sit nice and flatly.  Hence, a little extra step which, when done correctly, makes a nice finished edge, holds the lining behind the fashion fabric, and keeps everything from shifting around.  The key here is to be VERY careful.  Since the needle of the machine has to penetrate the fabric, you don't want to have to rip anything out and do it over- the result could be needle holes in your fabric that are visible!  After all these hours of work, that is the last thing you want.  I start by very carefully pinning around the bodice.  I make sure that I tuck the lining slightly behind the fashion fabric so that none of it is visible (especially important here with the white lining!)  I then VERY carefully sew around the outside of the entire garment.  The result- a nice evenly stitched line that shouldn't be visible except up close.  I carefully match my thread colors to my fabric, so it is truly invisible except if you are up close and looking for it.  This really stabilizes the lining and the bodice itself.
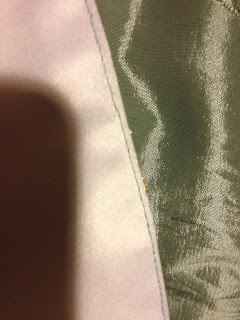
Here is a view of the lining side of the fabric.  Note the nice, evenly spaced stitches.
Voila!  This is pretty much the end of the machine process.  I will have to sew the arm hole seams by hand.  Also, there have been very few trims that I have been able to do by machine, most of the time little invisible hand stitches are best.


So, where are we at time wise?
Cut and attempt to sew evil lining- about 1 hr
Recut and sew good lining- 1.5 hrs
Sleeve reconstruction, cutting and sewing- 2 hrs
Sew lining to bodice- 1 hr (takes forever to pin that sucker!)
Flat sew seams- about 1 hr (again, takes forever to pin that sucker!)
Total time this section- 7.5 hrs or so
Total time for the project: About 20 hours.

The price for the bodice so far is difficult to say because I had a lot of parts and pieces already.  But here are some guidelines:
Fashion Fabric- it was 18.75 a yard, and I used roughly 2 yards with carefully placing the pieces on the best of the embroidery and with the grain.  So, about $38.
Lining Fabric- I used about 1 yard since I didn't care as much about exactly location of pieces, but still kept with the grain. That most likely cost me about $10 a yard, so about $10 here.
Boning- since I already had this on hand from corset making and I buy spring steel bones by the roll in bulk, I will have to make a rough estimate here.  Between dividing the tools needed to cut the boning, the boning itself, and the tipping, I would estimate that this cost me about $20.
Thread- I buy the good stuff, so guess about $7 here.
So, total for the bodice so far: about $75.
The most expensive part of this whole thing is not the fabric; it is the trim!!!  And the massive yardage needed for skirts and overskirts is nothing to sniff at either!!  So, beware the low sounding budget here, the worst is yet to come!